'Tag'ging Santa - festive makes #gifttags
- saiasmidreamzinyar
- Nov 11, 2025
- 7 min read

Festive season is almost here! Christmas Flea Markets too and as crafters, we are on a constant hunt for #quickmakes and #funcrochet patterns.
Market prep can be overwhelming, so some easy, attractive small ticket items give you the pep. So here's presenting my version of quick to make #bagtags #gifttags #keytags - Tagging Santa!

Add the pattern to your Ravelry Faves and show some love :)
Tagging Santa - is a Santa's Hat shaped bag/key tag. It's made just out of the most basic of stitches, chains, slip stitches and single crochet!
Quick to make; it can be done with small bits of scrap yarn in festive colors. and a bit of feather yarn adds more magic!
Featured in the picture are Tagging Christmas #gifttags along with my Tagging Santa one!
CLICK on the picture to head to the #freeonblog pattern for the Tagging Christmas.
The best part is that they can be made in one sitting. You can make it colorful using scrap yarn and make them as colorful and fun as you like!
This pattern is #freeonblog forever and will include picture instructions. In addition, scroll down to find a #free printable Stickers you can use to add to your Packaging!
As a BONUS, get the template of the Stickers and Labels for #marketprep as a #freedownload and get set for #market #festive prep!
SCROLL down to get to where you can download it the Template as a PDF.

This multi-use pattern can be used as bag tag, gift tag or key tags! The pattern will be #free #freeonblog for all time.
The #crochetpattern on this blog includes instructions to make
The Base Hat pattern (made with loops)
Edging / Finishing the Santa Hat by joining the loops.
Adding the Trim and the pompom
As a BONUS, get the template of the Stickers/ labels you can use as an add to your gifts.
#freedownload and get set for #market or #gifting prep!
SCROLL down to get to where you can download it the Template as a PDF.

You like what you see! check out Tagging Christmas pattern - Also #freeonblog. Click to head over there!
INSTRUCTIONS to make the Tags
SKILL Level – Easy with a bit of sewing in the tails. The project requires crocheting in all three loops of the beginning chain.
About Pattern: This quirky version of a Santa hat and is a fun way of using just simple crochet chains and placements of joining by slip stitches.
COMPLETED SIZE: Any weight of yarn works. Ideal being DK weight or more.
This gives a good sized tag that can be used for bags or even key rings.
Total length: 5" including the tag loop.
Length of the motif: 2.25"
If you'd like more fun and quirky market makes - you can always check out more patterns from my Ravelry or Lovecrafts stores.

Materials:

Yarn Used: Yarn of choice – DK weight cotton yarn. Total Yardage: 88 - 98 yards for 50g
I have used – approximately 4 yards of the red yarn for the base or body of the hat; 2 yards of white feather yarn or just white yarn for the Trim and bobble.
I have used Zuchi Ami Cotton yarn for the featured project in the pattern. and a tiny bit of a feathered yarn in white (Heartbeats Mink).
Crochet hook – I HAVE USED: 3.5mm hook for the project featured in the pictures. You can use crochet hook, a size or two smaller than you’d usually use with the yarn. This gives you tight stitches and rigidity to the project.
Scissors and a needle to finish up.
GUAGE: N/A. According to the gauge/yarn/ hook used, the size and stiffness of the project may vary. Custom instructions will be highlighted.
Stitches used: US crochet terms
ch - chain
ss – slip stitch
sc – single crochet
dc - double crochet
PLEASE NOTE:
· ch1 doesn’t count as a stitch, unless specified.
As a BONUS, get the template of the Stickers used in as a #freedownload and get set for #market #festive prep!
SCROLL down to get to where you can download it the Template as a PDF.
LET’S START!!!
PART 1 - The Base Hat :
Using Red/reddish yarn, make the base as follows.

STEP 1: Ch 10, slip stitch into the first chain.
ch 10 and TURN.
STEP 2: slip stitch into the top of the previous slip stitch.

As a BONUS, get the template of the Stickers used in as a #freedownload and get set for #market #festive prep!
SCROLL down to get to where you can download it the Template as a PDF.

STEP 3: Ch 8, TURN, slip stitch into the top of the previous slip stitch.

STEP 4: ch 8 and TURN, slip stitch into the top of the previous slip stitch.
As a BONUS, get the template of the Stickers and market prep Labels as a #freedownload and get set for #market #festive prep!
SCROLL down to get to where you can download it the Template as a PDF.
STEP 5: Ch 6, TURN, slip stitch into the top of the previous slip stitch.
STEP 6: ch 6 and TURN, slip stitch into the top of the previous slip stitch.
STEP 7: Ch 4, TURN, slip stitch into the top of the previous slip stitch.
STEP 8: ch 4 and TURN, slip stitch into the top of the previous slip stitch.

This makes the main body of the hat.
Now we make an additional loop to work the bobble in later.
STEP 9: ch3 and TURN, slip stitch into the top of the previous slip stitch.
DO NOT CUT the yarn. Continue to the next STEP.
As a BONUS, get the template of the Stickers and market prep Labels as a #freedownload and get set for #market #festive prep!
SCROLL down to get to where you can download it the Template as a PDF.
PART 2 - Making the tag loop and finishing the hat :

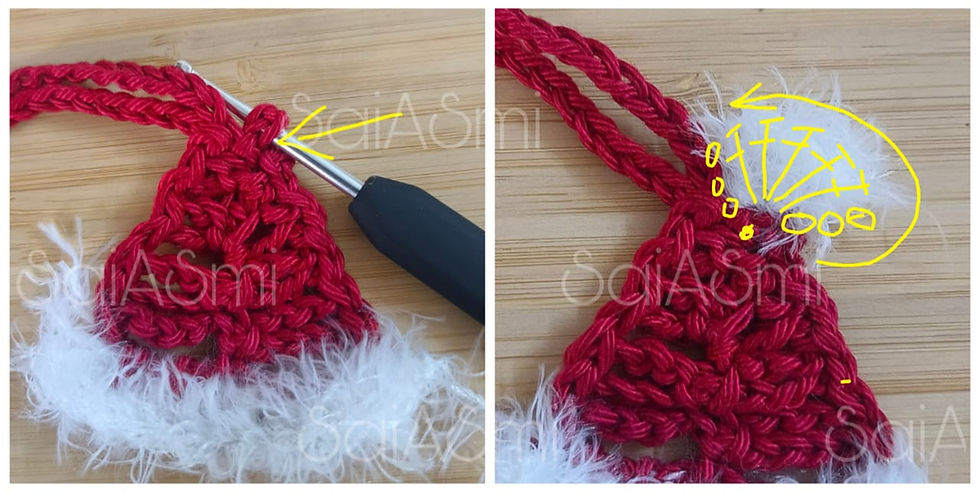
STEP 9: Making the loop.
Continuing from where we stopped in STEP 8, ch 35 and slip stitch into the point as the previous slip stitch. (Marked in the picture with a dot)
DO NOT cut the yarn. We will work the next STEP from this point onwards.
STEP 10 - Working around the 3 sides of the body of the hat to join them all!

Work down the side of the hat;
(ch1, ss into the next loop)* 4 times.

Work the bottom edge of the hat as follows:
ch2, (sc, ch1)* 2 times, sc into the slip stitch as shown in the picture;
(ch1, sc)* 2 times, ch2.

Work up the side of the hat;
ss into the same loop, ch1,
(ss into the next loop, ch1)* 3times.
Slip Stitch into the same stitch we began this STEP with.
Fasten off and weave in the ends.
If you'd like Ad-Free PDF patterns - check out more of my patterns from my Ravelry or Lovecrafts stores.
PART 3 - Adding the trim and the bobble :

Using a feather yarn/ just white yarn we work the TRIM and bobble as marked in the picture!

Join the yarn for the Trim in the ch2 space we made on side of the side of the bottom edge.
Work the trim as marked in the picture.
ch3, make 3 dc in the same space,
make 1dc in each ch space and sc that follow,
when you reach the next ch2 space; make 4 dc in that space, ch3 and slip stich into the same space.
Fasten off and weave in the ends.
Join the yarn for the bobble in the ch3 space and work the bobble as follows:
ch 3, 5dc in the same ch space, ch3 and slip stitch back into the same spa
Fasten off and weave in the ends.

As a BONUS, get the template of the Stickers used in as a #freedownload and get set for #market #festive prep!
SCROLL down to get to where you can download it the Template as a PDF.
If you liked this technique and you'd like to make a matching set as shown below; Click the picture to head over to the 'Tag'ing Christmas pattern #freeonblog.
If you'd like more minimum sew patterns and #quickmakes - you can always purchase the same from my Ravelry or Lovecrafts stores.

As a BONUS, get the template of the Stickers used in as a #freedownload and get set for #market #festive prep!
SCROLL down to get to where you can download it the Template as a PDF.
If you like quick projects, and minimum/ no-sew projects – then check out my other patterns in my Ravelry Store.
Lastly, I would love to see your projects, so please do tag ‘Pattern by #saiasmidreamzinyarn’ on any Social Media platform, and I will be able to see them. This is totally optional. You can sell or gift the items made with this pattern, but please DO give credit to the Pattern and mention the source of Pattern. THANK YOU!
Any purchase made without checking the same, cannot be reverted
Here are some more of my latest patterns! Pin to your Idea board on Pinterest today! Click to read more about these patterns!


Check out more of my crochet and knit Patterns on Ravelry.
If you'd like to take advantage of the BONUS discount on Coaster/Cozy patterns or the e-books in my store - head over to the Ravelry BUTTON (MAKE sure to add the e-books to a new Cart to avail the discount with no code)
SCROLL DOWN to see some of my recently featured Patterns from previous blog hops! Click on picture to head to the blog post!


Another way to appreciate the Designers!
Hitting on the ❤️ on a post, is a huge boost in encouraging a Designer/Crafter. Linked
are the Instagram profiles of every Designer who has collaborated to make this Pattern Bundle and Blog Hop possible.
I can make customized projects for you. Ideal and handmade for Gifting for Special occasions, baby showers, party favors and hostess gifts.
If you want to get a custom product, design made, you can reach out to me via the
webpage, or check my SHOP on this website for available and Custom order products.
#gifting #handmadegifts #handmadewithlove #customorder #handmadetoys #saiasmidreamzinyarn #saiasmicreates #gifthandmade #celebratehandmade #supportsmallbusiness #localcrafts #bangaloreinstagram #bangalorecrafter #crochet #knitting #customknit #customcrochet


Comments